close

ONLINE PORTAL-USEFUL TIPS

A selection of useful guidelines for account holders looking to join Wigmore's new online community


Tip #1—Temporary password/PIN

What to watch out for when you have received your activation email

  • While clicking the link contained within the Welcome Activation or Eligibility email from us, please make sure that you enter the password characters correctly or just copy and paste the temporary password within the relevant password input box
  • Each of our customers who have done this correctly have gone to the next stage without any problem and are already realising the benefits of Wigmore's digital platform


Tip #2—Account registration/validation process

Your account has to be validated before you can enjoy the benefits of our online portal

  • You’re strongly recommended to watch the help video on Wigmore's account registration page
  • Please ensure that you fully complete the account registration process—you will not be eligible to buy products until you do this
  • In order to be get all the benefits the digital platform has to offer, your account must be activated/eligible—this is done by Wigmore customer services once you submit your validated account registration form and have provided your eSignature and photo ID
  • Until you have been made eligible to use the digital platform, the prompt message “You’re not authorised…” will appear
  • In order to get the full settings updated properly after receipt of your Eligibility email, please ensure that you sign out and re-sign in
  • If you are unable to move to the next page, this means a mandatory filed has not been filled out— please look at the message prompt and complete the missing field within the required step of the account registration process


Tip #3—Esignature/photo identification stage

Having difficulty uploading an image?

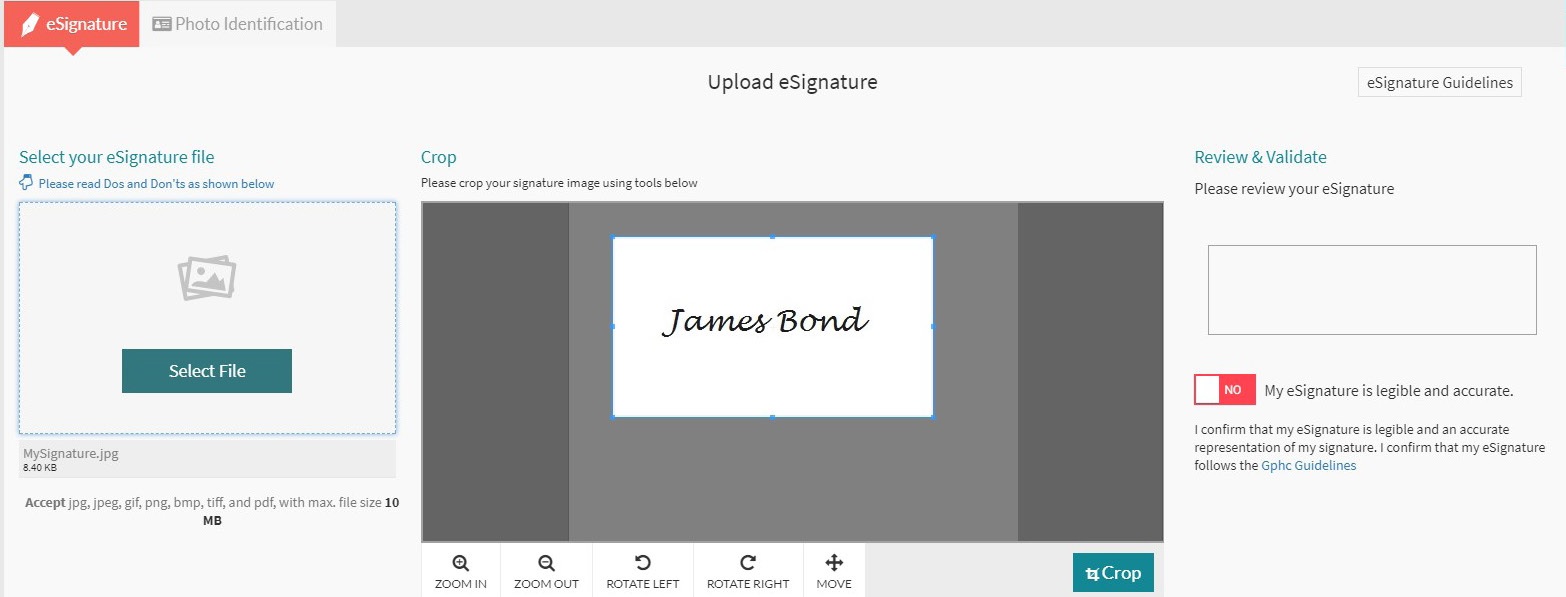
  • Please ensure that the file you are trying to upload for your eSignature or Photo Identification is one of the supported file formats and smaller than 10 MB—correct the file format or size if you are prompted to do so
  • If uploading a big file, please be patient for this to appear in the crop section—use the imaging tools and ensure that the eSignature is fully contained within the blue rectangle. Once satisfied, please click crop to get your eSignature to the Review/Validate section
  • You can always re-select the same file or a different file if the image within the crop section is not to your liking—please select the file once again and this will over-write your previous file
  • Next Arrow will not be enabled until you have moved your eSignature to the Review/Validate section and have checked YES below
  • After pressing Next Arrow, you will navigate to the Photo Identification step. Here you are asked to choose the Photo ID type and Select Photo Identification File and this will be ready for you to review and confirm to get to the final step
Image 3.1


Tip #4—Patients and prescription

Your account has to be validated before you can enjoy the benefits of our online portal

  • Depending on your prescription needs, eligibility and the chosen product category, you will be able to choose between Rx Price and Stock Price for a product—the application automatically creates a prescription once you have chosen the patients and assigned the requisite quantities of the chosen Rx product to that patient
  • Image 4.1 displays two products that have been moved to the bag—one at Rx Price and the other one at Stock Price. Assuming that you have patients added to your platform, you would be assigning patients to the Rx priced product, which in this case is Azzalure
  • Click Choose Patients as highlighted in image 4.1 and you will move to the second step as displayed in image 4.2
  • Click the small ‘Person Icon’ (image 4.2) and you will see the left hand side panel expanding (image 4.3)
  • Scroll through the patients to identify the required patient or search for the required patients (image 4.4)
  • Please check the check-box appearing to the left of the patient's name (image 4.4) and click the orange notepad icon to input clinical needs and/or directions for use (in some cases, this input will be mandatory based on the chosen product)
  • The quantities that you will input for specific patients will be added together and will over-write the quantity of chosen product
  • After choosing the patients, as displayed in images 4.3 and 4.4, please click Selected Patients next to the search box (this is displaying the counter of patients) and you will navigate to the reviewing stage
Image 4.1


Image 4.2


Image 4.3


Image 4.4


Tip #4 Continued
  • Please review the patients and quantities chosen by you and then click Assign Patient (image 4.5). This will complete the assignment process and prescriptions will now have been generated automatically for the chosen patient and products
  • As shown in image 4.6, you will see the chosen patients' details for the Rx product. Your stock product is not shown here and can be seen again once you click My Basket
Image 4.5


Image 4.6


Tip #5—Creation/addition of new patients

Depending on your need, there are three ways to create/add patients

1. If you wish to add a new patient when you’ve already moved the products to the bag and you don’t have many patients to add, this might be your preferred way:

  • Please click on Add New Patient (image 5.1) that appears when you click on the person icon next to the product
  • This will flip the interface and give you the option to Add/Create New Patients. Please notice the vertical scroll bar appearing as the gender and address fields need to be inputted as well. You will notice an Add icon when you scroll-down and this needs to be clicked. The newly added patient will now appear in the list and is ready for you to assign quantities or clinical needs as per your requirement.

2. The more conventional way of adding patients when you have quite a few to add is by navigating to the main menu of the digital platform and then going to My Wigmore Portal -> My Patients (image 5.2). Once you click the My Patients sub-menu

3. And finally, for the more advanced way of adding patients where you have to add over 100s or 1000s of patients in one go, there is an Easy Patients Manager Tool (image 5.3) which allows you to directly move/upload/export your own patients data onto the digital platform. Please do adhere to the guidelines while doing so and follow the on-screen instructions

Image 5.1


Image 5.2


Image 5.3


Recommended
© Wigmore Medical is a registered pharmacy: no. 9012271